You’re a new sales rep and marketing just assigned you a 1,000 leads in your territory. The VP of Sales walks past your cube, gives you a slap on the back and says, “go get ’em tiger!” Where do you start? The concept behind a Lead Score is simple – use data to quickly determine which Leads are more valuable (i.e. more likely to convert or buy) than others and work those Leads first.
When discussing the concept of Lead Scores I can think of three distinct types:
Engagement – These scores are determined with the help of third party marketing applications (think Pardot, Marketo, Eloqua, Act-On, etc.). They measure the engagement or ongoing interaction a Lead has with your company. That interaction can be all sorts of marketing touch points such as registering for a webinar, visiting your website, opening your emails, clicking links, etc. The concept here is the more engaged the Lead (the more interactions), the more likely they will become a customer (i.e. ready or likely to buy). Of course the downside is that it takes a fairly high investment in time and money to use these third party apps to get everything up and running well. Some of the bigger marketing platforms can take tens of thousands of dollars to implement and potentially months to setup, deploy and fine-tune.
Qualification – This score is really designed to know if the Lead is ready to be converted into an Account, Contact and Opportunity. My fellow MVP Deepa Patel likes to use “B.A.N.T.” as the components of her qualification score: Budget, Authority, Need, and Timeframe. By having the Lead answer some qualification (or “knock out”) questions you can derive a score as to their readiness to convert and move forward in the sales process (e.g. are they the decision maker, do they have budget, do they have a defined project, what is the timeframe).
Data Quality – This is where we are going to focus our attention. It’s designed to help our fledging new sales rep mentioned above make the best use of their time dialing for dollars. The good news is this score can be created using native formula fields by a System Administrator. I’ll cover what you can do with Professional Edition, and how you can get a bit more fancy with Enterprise Edition and Workflow.
First let’s cover the three components of our Data Quality Score. All of them with be custom formula fields, with an number as the output format and the decimal places set to zero:
Newness (or Aging)
As a Lead ages, it becomes stale and our likelihood to contact that individual plummets dramatically with time. The statistics on this topic are actually quite staggering and thus why it’s a key component of our overall Lead Score (see slide 5 of this presentation on Inside Sales Best Practices).
If(TODAY()-DATEVALUE( CreatedDate )<5,25,
If(TODAY()-DATEVALUE( CreatedDate )<10,20
If(TODAY()-DATEVALUE( CreatedDate )<15,15,
If(TODAY()-DATEVALUE( CreatedDate )<20,10,
If(TODAY()-DATEVALUE( CreatedDate )<25,5,0)))))
What the formula is doing above is looking at today’s date and subtracting the date the Lead was created and that results in a number (number of days). If the number of days is less than five, I give 25 points, if it is less than 10 days old I give 20 points and so on until if it is over 25 days old I’m giving zero (0) points. Notice I have to wrap the Created Date field in a “DATEVALUE” formula to convert the Created Date’s Date/Time syntax into a Date value in order to do the calculation.
Completeness
The more information you have on a person, the more likely you can make contact with that individual. Do you have their email, phone number or extension, know what department they work in, or the website of the company to see if their bio and contact information is online?
If(ISBLANK(Title),0,5)+
If(ISBLANK(Street),0,5)+
If(ISBLANK(Email),0,5)+
If(ISBLANK(Phone),0,5)+
If(ISBLANK(Website),0,5)
The way the formula works above is that I’m looking at each field, and if it is blank (null), I’m giving zero points, if it is not I give five points. I’m adding up the score for five fields within the formula for a possible maximum score of 25 points.
Relevancy
I’m a big fan of being data driven when designing this formula. Run a conversion report by different fields and field values and see if there are any attributes that deserve to be in this formula. Look at fields like Lead Source, Industry, Title, No of Employees, and any custom fields you might have and see if there are certain values or even combinations of values that make a record more likely to convert and ultimately buy. Do “Referrals” convert better that other Lead Sources? Are certain industries better suited for your products and services? If you find a positive correlation to conversion (or won Opportunities), then add it to your Relevancy Score.
If(CONTAINS(Title,”CEO”),20,0)+
If(CONTAINS(Title,”COO”),20,0)+
If(CONTAINS(Title,”CTO”),20,0)+
If(CONTAINS(Title,”VP”),15,0)+
If(CONTAINS(Title,”President”),15,0)+
If(CONTAINS(Title,”Director”),10,0 +
CASE(Industry,”Technology”,15,0)+
CASE(Industry,”Telecom”,5,0)+
CASE(LeadSource,”Referral”,15,0)+
CASE(LeadSource,”Website”,5,0))
Let’s decipher the formula above. First I’m looking at the Title field to see if it contains a Title that describe the C-Suite (CEO, COO, CTO), and then I’m looking for Vice President or a Director titles and scoring that appropriately. Then I’m looking for specific pick list values in both the Industry and Lead Source fields. If I get the right value I give points, if not I give that field zero points. With the way the formula is written I can have points for the right Title (up to 20), the right Industry (up to 15) and Lead Source (up to 15) for a combined maximum Relevancy Score of 50 points.
Total Lead Score
Now that I have a score (number) calculating for Newness, Relevancy and Completeness, I’m adding all of them together to create a Total Lead Score.
Completeness_Score__c + Newness_Score__c + Relevancy_Score__c
At this point our new sales rep can run a Lead View or Report and sort the Lead Score from high to low and start dialing highest scoring Leads first. But wait there’s more!
Star Rating
This step is optional. I’m using an IMAGE formula field to give a bit of visual sizzle to our Lead Score. IMAGE formula fields are nice in that they display in the Detail View of a record, List Views and Reports.
IF (Lead_Score__c <=20, IMAGE(“/img/samples/stars_100.gif”,”1 Star”),
IF (Lead_Score__c <=40, IMAGE(“/img/samples/stars_200.gif”,”2 Star”),
IF (Lead_Score__c <=60, IMAGE(“/img/samples/stars_300.gif”,”3 Star”),
IF (Lead_Score__c <=80, IMAGE(“/img/samples/stars_400.gif”,”4 Star”),
IMAGE(“/img/samples/stars_500.gif”,”5 Star”)))))
This IMAGE formula displays up to five stars based on the Lead Score. If the Lead Score is equal or less than 20, the formula displays one star, if it is equal or less than 40, two stars are displayed, and so on until we get to five stars.
Professional Edition
If you want to use the Star Rating Image formula mentioned above you’re going to exceed the compiled size of the formula allowed by Salesforce and we’re going to get the dreaded “compiled formula is too big to execute” error:
Why did this just happen? Our formula simply got to big. We’re essentially building formulas on top of formulas (Relevancy formula + Newness formula + Completeness formula + IMAGE formula). For our IMAGE formula to run it has to run all the formulas behind it, which exceeded what Salesforce will allow.
First thing to try is to make your formula more efficient. Salesforce has this great guide, I believe written by Salesforce Product Manager Shannon Hale (@shannonsans on Twitter).
If you are really keen on using the IMAGE formula in Professional Edition rather than just rely on the total “Lead Score” field, you’re going to have to do some trimming and reduce the complexity of the underlying formulas. For example, you can replace the Relevancy formula with this lightweight version (and unfortunately less robust) and you’ll be able to save your IMAGE (Star Rating) formula.
If(CONTAINS(Title,”CEO”),20,0)+
CASE(Industry,”Retail”,15,0)+
CASE(LeadSource,”Referral”,15,0)
Workflow
If you are lucky enough to have Workflow (Enterprise Edition of higher), we can get around this compiled size error. It’s a nice trick to know as an Admin as it probably won’t be the first time you’ll get faced with the “compiled formula is too big to execute” error. There are multiple ways we can do this, but I’m going to keep it simple and use Workflow to perform the calculation in our Relevancy Score. We don’t want to replace out Newness Score with Workflow because for Workflow to fire (and calculate), we have to have a Save event on the record (either Create and Save or Edit and Save). The passage of time (ageing) will not make Workflow fire so it won’t have an opportunity to recalculate our aging. However if we keep Newness Score a formula, when you view a record (either in Detail View, a List View or on a Report) our Newness / Ageing formula will recalculate. For more on Workflow and how and when it fires, see this Workflow tutorial and this ShellBlack Whiteboard video.
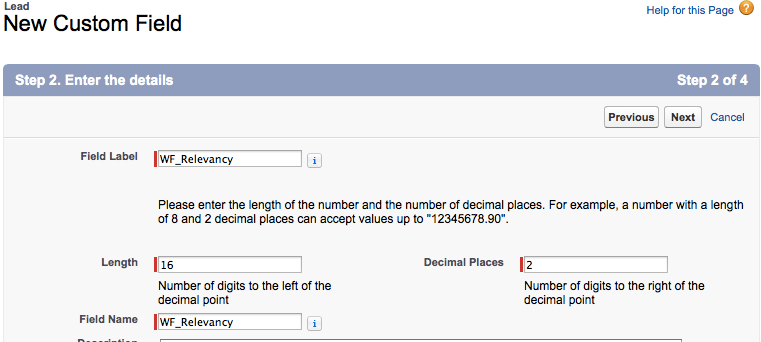
So let’s see how this is done. First, I’m going to create a number field that will hold our Relevancy Score that Workflow will populate. I’ll call it WF_Relevancy (for Workflow Relevancy).
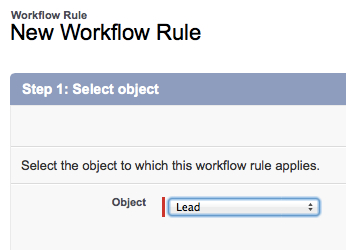
Then we’ll create our Workflow Rules that will calculate and populate our new WF_Relevancy number field. Navigate to Setup > App Setup > Create > Workflows and Approvals > Workflow Rules > and click the “New Rule” button
Step 1 is to select the Lead Object
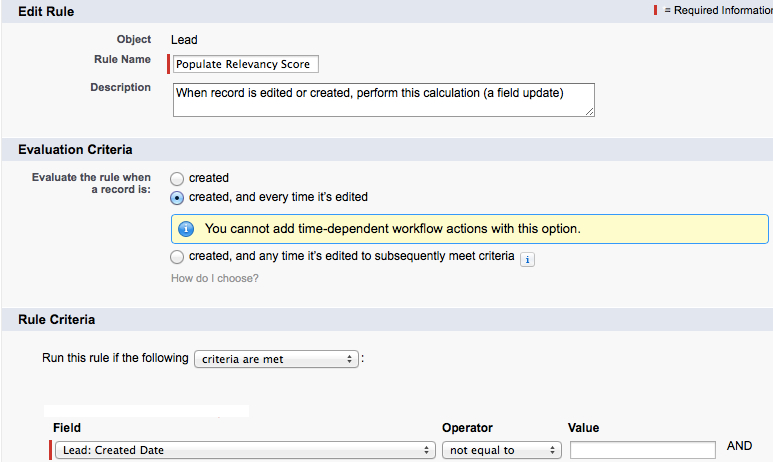
Step 2 is to set the Criteria that will determine when the Workflow Rule will fire. Notice I’m using the second radio button in the “Evaluation Criteria” section – this is crucial because you want the calculation to be performed EVERY time the record is edited and saved. For the Rule Criteria section of the Workflow I simply say the Created Date cannot be blank so it will fire every time the record is Edited and Saved as the Created Date is populated on every record.
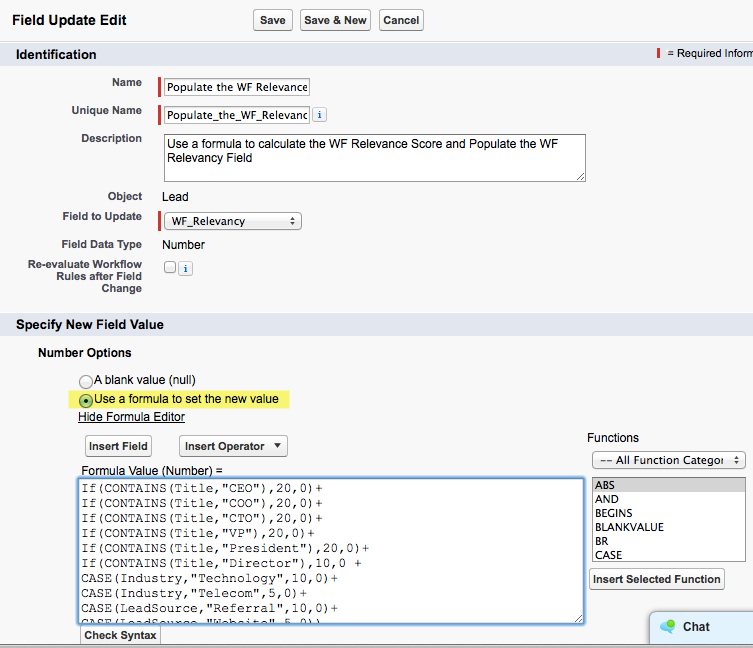
Step 3 is to select an Action (i.e. what we want the Workflow to do when it triggers/fires), and we want to pick a Field Update as our Workflow Action. On the next screen we pick our WF_Relevancy number field as the field to update, and specify that we want to use a formula to set the value. Be sure to show the Formula Editor to give you some working room on the page and then we’ll drop in the same Relevancy Score formula we used previously. Click “Save” and be sure you activate Workflow Rule!
We can then update our Total Score to use our new Workflow populated Relevancy Score:
Completeness_Score__c + Newness_Score__c + WF_Relevancy__c
By going through this extra work of creating a Workflow Rule we’ve broken the chain of formula fields built on top of other formula fields, which allows us to get well under or compiled formula limits so I can use my IMAGE based Star Rating. However, all of your existing Leads with have a WF_Relevancy Score of zero because you need an Edit / Save event on the record for the Workflow Rule to be evaluated and fire. Your choices are to manually hand edit all the records and that will fire the Workflow Rule, or since you have Enterprise Edition, use an API tool like the Data Loader to mass update all the records (populate a hidden field for example) and that will trigger the Workflow Rule to fire on all records and get your Lead Score calculations up to date.
Closing thoughts
The weighting of the Lead Score attributes are all up to you. I just wanted you to get started with some examples. Feel free to add more or less points as you see fit to your Relevancy, Newness (Aging) and Completeness formulas based on your business. As much as you can, use data (conversion and win rates) to guide your weightings. The goal here is to use a relatively simple method to allow the hotter, better quality leads to bubble up to the top so you can maximize the precious time of your sales reps.


