Inevitably as a Salesforce Administrator, you’ll be faced with the task of reassigning ownership of records in Salesforce. Typical use cases that force this to happen are:
- Turnover (or hopefully growth!) at your company
- Territory realignment or new markets added
- An acquisition or reorganization
- Further segmentation or consolidation of duties
- People get promoted to new roles in the organization
Luckily Salesforce provides a wizard to help you change ownership of records with a few clicks. However there are some very real limitations that might make you consider using a tool like the Data Loader. Some things to know:
You can only transfer ownership of 250 records at a time
This is not so bad if you have a 1,000 or so records to transfer (for 1,000 records you’d transfer 4 blocks of 250 records), but if you need to transfer tens of thousands of records use the Data Loader.
The wizard only lets you transfer ownership of Leads, Accounts, and Custom Objects
What if you want to reassign Contacts separate from Accounts, or other standard objects like Cases, Opportunities or Campaign records? Well, the Data Loader is the option for you.
You only have five (5) filter criteria available to specify which records you’d like to transfer
If you have to be surgically precise and need a lot of filters (or “AND” / “OR” filter logic) to isolate the records you want to transfer, you’d probably be better off writing a report along with the record ID and using the Data Loader.
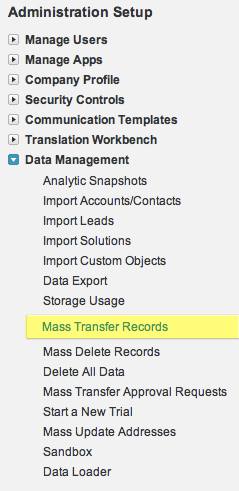
Assuming none of the above are a showstopper, then let’s take a look at the wizard. To get to the Mass Transfer wizard you’ll go to Setup > Administration Setup > Data Management > Mass Transfer Records
You’ll be presented a list of the wizards available. Let’s look at the Transfer Leads option first (which by the way is almost exactly the same interface for transferring Custom Objects).
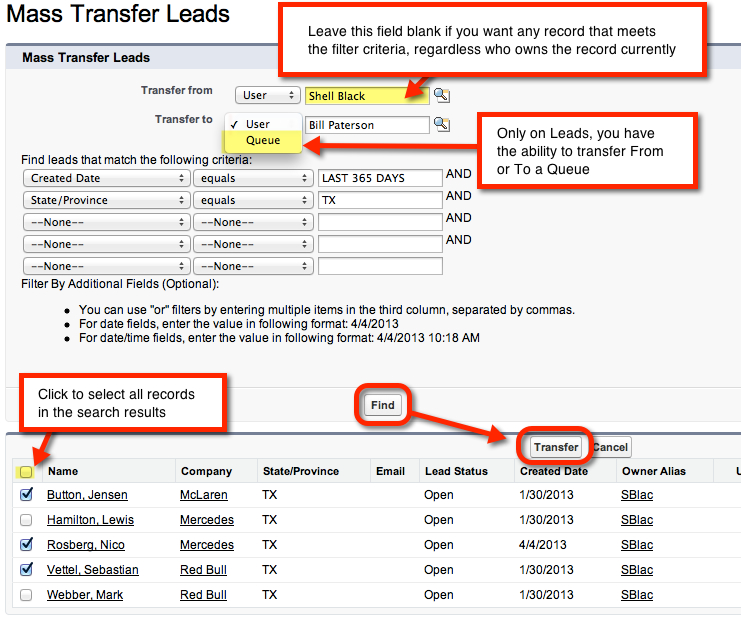
At the top you’ll see the ability to specify the current record owner, and who you want to be the record owner after the transfer. If you don’t care who owns the record currently, then leave the first field blank (thus why it’s not a required field). In this step for Leads only, you can also transfer From or To a queue (refer to the screen shot).
Once you’ve determined who will own the records after the transfer you can start applying up to 5 filters. In my example I’m using a relative date filter to specify that the record must have been created in the Last 365 Days and the Lead address must be in the State of TX.
Once you have your filters in place, click the “Find” button to see how many records meet your criteria. You can select individual records to be transferred using the checkbox to the left of each record (as in my screen shot), or you can check the box at the top of search results (highlighted in yellow) to select all the records in the search results.
If you have more than 250 records in your search results you’ll see this error explaining that if you click the “Transfer” button, you’ll only be reassigning the first 250 records.
Lastly click the “Transfer” button to change ownership of the records.
When transferring Accounts you’ll see some additional options as to how you want to handle any related Open or Closed Cases and Opportunities. I would think in most instances, you’ll want to keep history intact and not transfer Closed Cases or Closed Opportunities (which could impact your historical reporting!) – however the option is available.
Things to remember:
- To transfer a record you have to have the correct Profile permissions (Edit and Transfer) for that object. If you are a System Administrators you’re good to go!
- Be thinking about your company’s security model. If you have a “Private” org, you could potentially be impacting record access for users
- Contact records are transferred along with Account record ownership automatically (again, if this is not what you want – use the Data Loader)
- Notes, Attachments and Open Activities (unless being transferred to a Lead Queue) are also automatically reassigned with a record transfer


