If you have ever seen me train new Users on how to work with Salesforce.com you’ll hear me say at least a half dozen times “Search before you create!” Inevitably your Users are going to create a duplicate Account or Contact in your Salesforce instance. Don’t panic. Salesforce has some easy-to-use wizards that can help you clean up our data. Just take a few moments to teach your Users how to de-duplicate Accounts and Contacts and let them clean up the data as they come across the errors.
But what do you do if people have been actively using both records – logging activities, sending emails, attaching documents, etc? Lucky for us, the wizards merge the two records and any associated related list items are retained rather than deleting during the merge process. This is great, as otherwise you’d spend a lot more time copying and pasting data between records and re-associate child records (related list items) to the record you want to keep.
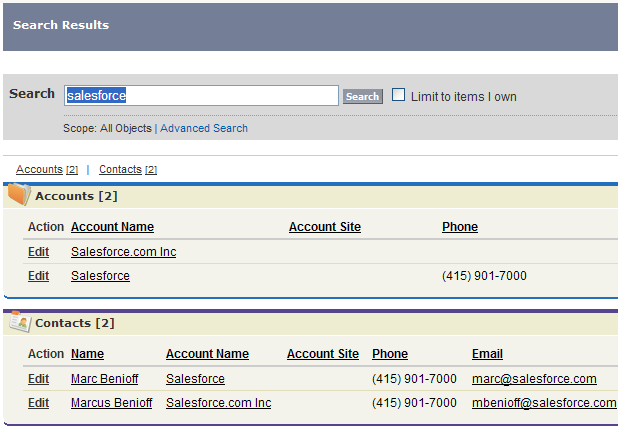
As an example, here is a search for “Salesforce” that brought back two Accounts and two Contacts – records that suspiciously look like they may be duplicate records.
First let’s tackle merging the Accounts, and then we will clean up the Contact records.
Click on the Account tab. You’ll see some of your recent Accounts and a list of links below in two columns labeled “Reports” and “Tools.” In the “Tools” column on the bottom right, click the link labeled “Merge Accounts.”
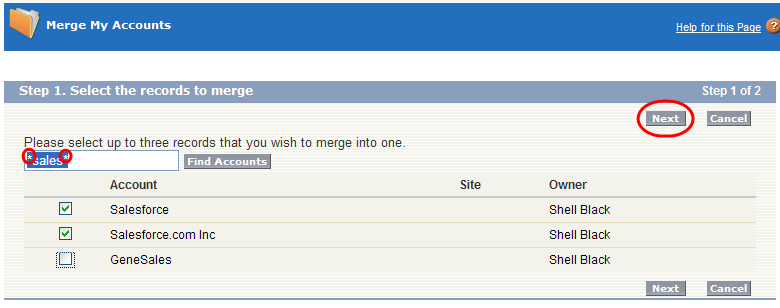
You’ll then see Step One of the Wizard. Here we will search for our suspicious Accounts by entering “*sales*” and clicking the “Find Accounts” button. I used the “*” wildcard on the front and back of “Sales” in the search box to find records that contained “sales,” not just records that started with “sales.” Had I not used the wildcard, I would not have found “GeneSales” in my search results.
You can select up to three records to be merged at one time. If you need to merge more than that, you just repeat the process. In the search results in this example, I’m going to select the two results that look like Salesforce, and click “Next” in the wizard.
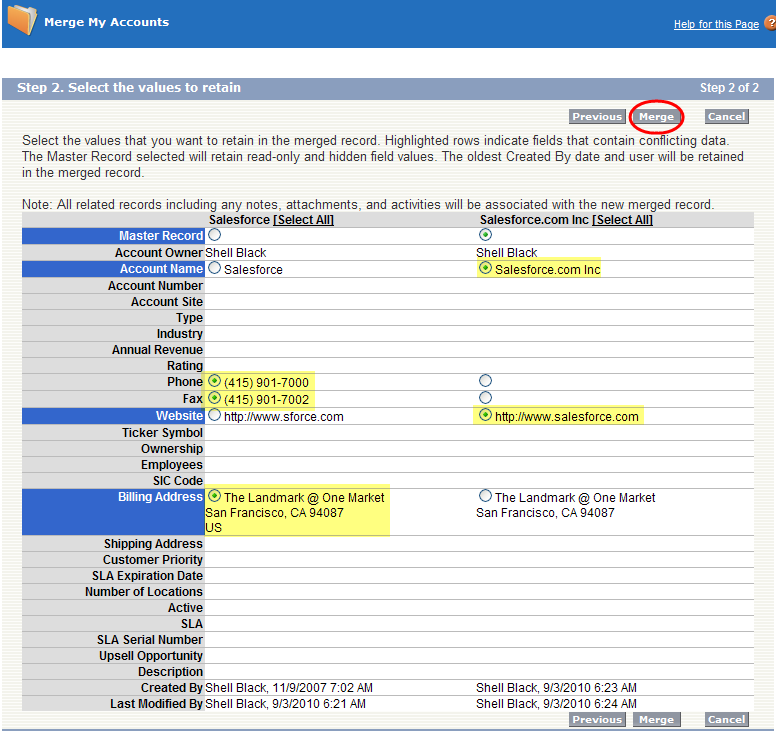
Next the wizard presents a side-by-side comparison of the two records so I can choose the fields I think contain the most accurate information before I merge them together. The “Master Record” displayed as the first selection, at least for your Users, will be their best guess at which of the records is the keeper. What it really tells Salesforce is that any hidden fields that might be on that record that the User can’t see due to the User’s profile (and thus can’t make a selection) will be kept. Administrators should be able to see all the fields, so this is a non issue.
The User will get a quick confirmation message – click “OK”:
Now that wasn’t too bad now was it? OK, let’s merge our two rogue Contacts. To do this you will want to view the Account record that contain the duplicate records and scroll down to the Contact related list. Here you will find a button labeled “Merged Contact” – click it!
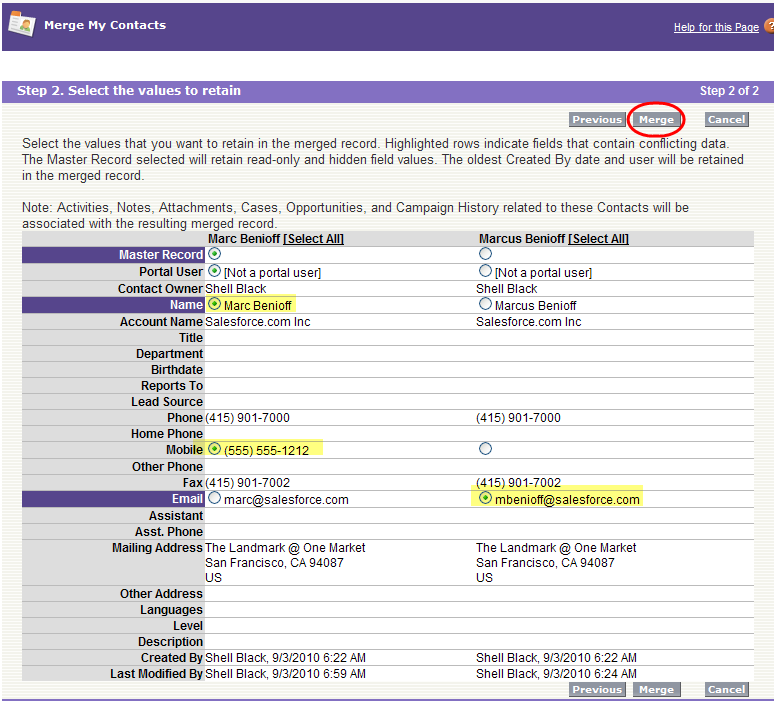
You’ll see the wizard for merging Contacts is the same as Accounts. First you either search or select the records you want to merge (you can select up to three), then click “Next.”
Notice if the field data is the same you don’t have to make a selection. On the fields that are different, make your selections and click “Merge.”
You’ll have to acknowledge the merge in the pop-up window. That’s it!
Things to note:
- You can merge Accounts if you are an administrator, the Account Owner, or a User above the Account Owner in the Role Hierarchy and you have the appropriate User permissions.
- When merging two Accounts that you do not own, you must have “Delete” permissions on Accounts and “Edit” permissions on Opportunities and Cases.
- When you merge Accounts that are listed in the “Parent Account” field of other Accounts, the newly merged Account is linked only to the Accounts of the selected Master Record.
- When you merge contacts that have “Reports To” relationships, the newly merged Contact retains the “Reports To” field from the selected Master Record.
- If you are merging duplicate Contacts that are members of different Campaigns, the Campaign “Member Status Updated” date for each Contact is retained and associated with the newly merged Contact.
- Before merging Contacts that both have active Self-Service usernames, deactivate one Self-Service username. The merged record will adopt the active Self-Service username.


