We’ve covered a lot of ground up to this point about the native email functions in Salesforce.com. To recap, we’ve blogged about how to make an email letterhead that includes your branding, how to create HTML email templates with merge fields that leverages a letterhead, how to code up a full HTML email in Salesforce (that does not use a letterhead), as well as how to know if your HTML email was opened and delivered. In this post we’re going to talk about the capabilities of the native mass email function in Salesforce and how to send a mass email.
Depending on how many emails you need to send, the native mass email function may not be the solution for you. Salesforce limits you to 1,000 emails in a mass email blast per day. The “Day” is defined by Salesforce as a 24 hour period based on Greenwich Mean Time (GMT) – not your local time. (Using the API or Apex, you can send single emails to a maximum of 5,000 emails per day). Furthermore there are governor limits on how many emails you can send out in a single “blast” based on your edition of Salesforce. If you are running the Professional Edition of Salesforce, that’s 250 emails in a single blast, or if you are running Enterprise Edition, 500. For those lucky folks on Unlimited Edition, you can send 1,000 emails in a single blast. The native mass email function is only available in Professional, Enterprise, Unlimited, and Developer Editions. So, if you have 4,000 emails that you need to send and you’re running Professional Edition, you’ll have to break up your email list into 16 blasts of 250 emails each, and schedule them to be sent out in 4 blasts of 250 emails a day for 4 days.
Quickly you start to understand why many companies use a third party email service provider (ESP) to send their mass emails in order to get around these governor limits. Why would Salesforce put these constraints in place? It’s all about ensuring email deliverability from their servers to your customers. Salesforce doesn’t want a rogue customer sending out tens of thousands of inappropriate emails that result in ISPs (Internet Service Providers) getting a lot of their end-users flagging emails sent from Salesforce as SPAM, which can get a Salesforce server blacklisted by that ISP. If that happens, any Salesforce customer on that server won’t be able to send emails communications to recipients at that ISP.
A lot of our Dallas clients have asked us when they should consider using an ESP to manage their email blasts versus using the native Salesforce mass email function. Besides the aforementioned governor limits, here are some other “gotchas” or things to know about the native mass email function in Salesforce:
- Though Salesforce allows you to see email open rates with reports, it cannot tell you what happened after the email was opened. For example, Salesforce cannot tell you if someone clicked on a link inside the email.
- Salesforce does not have a method to manage “opt outs” (so it can comply with the CAN-SPAM Act). However there is a AppExchange App from Salesforce Labs that can add some code to automate opt outs
- If the native “opt out” checkbox has been checked on a Lead or Contact, that record is automatically excluded from any mass email (you don’t have to add a filter to exclude those records in the mass email wizard – Salesforce has you covered).

- You cannot set or change the sending / from email address in the mass email wizard. The person executing the mass email will be the “from” on the email. This makes it very challenging if you are sending an email on behalf of another User or if you wanted to use an Organizational Wide Email Address (Setup > Administration Setup > Email Administration > Organization-Wide Addresses).
- You can only send a mass email to the native email field. If you have custom email fields to capture a personal or secondary email address, these will be excluded from the mass email and there is no way to tell Salesforce to use a custom email address field
- If you have multiple records in your list with the same email address, you will send multiple emails to the same email address (Salesforce does not de-dupe or send based on unique email addresses)
- Attachments are sent as links rather than attachments. Salesforce keeps those links active for 30 days. The recipient can click the link, which opens a web browser so they can download the attachment
- On the plus side, the native mass email wizard does allow you to log the mass email as a completed activity against that Lead or Contact. TIP – the “Subject” of the activity will default to simply “Mass Email: ” unless your you’ve populated the Description field on the email template used for that mass email (highlighted below in the screenshot). Take the time to do this step as your users will want to know what mass emails were sent to their clients!
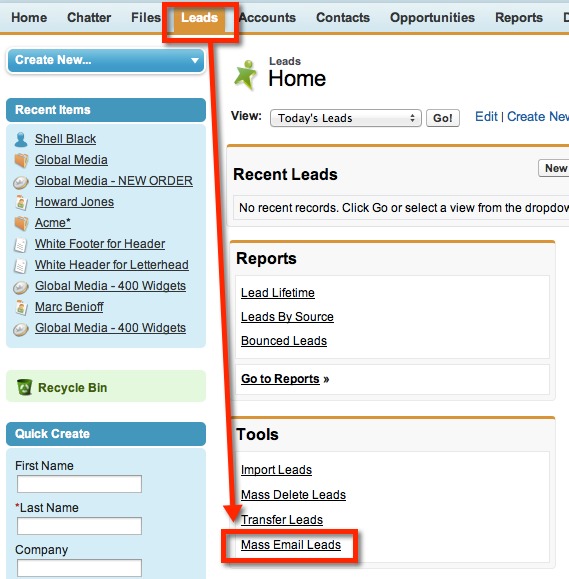
Still want to try it out? The first step is to have your email template ready to go. Refer to the links in the first paragraph of this blog post on how to create your email communication. Then you either go to the Lead Tab or the Contact Tab and scroll down the page until you see the Mass Email link in the Tools section.
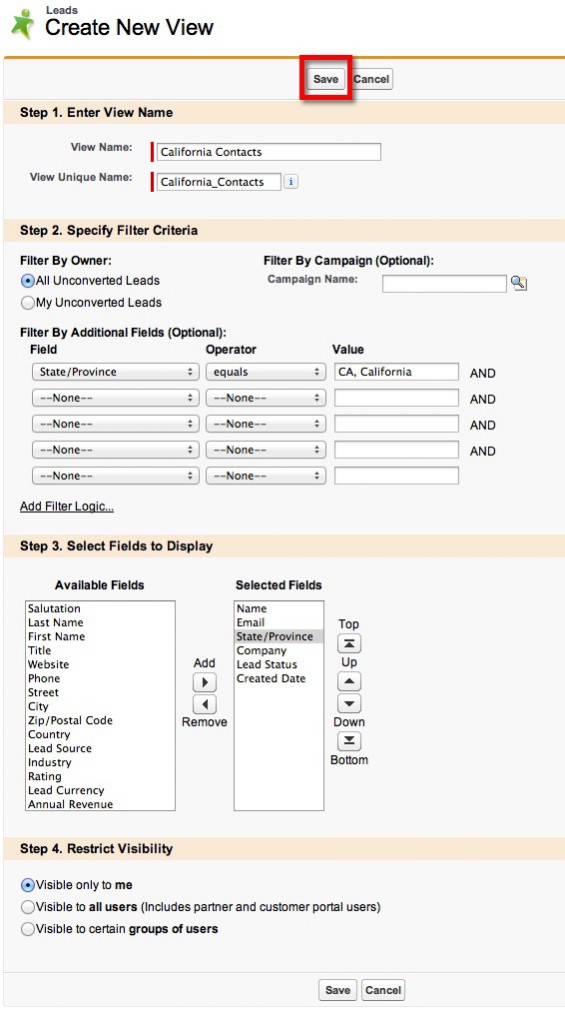
On the first step of the mass email wizard is to create your target list. To do this you have the option of leveraging an existing View that is available on the Leads tab, or you can create a new View from within the wizard. In this example we will create our target list from within the wizard by clicking the Create New View link.
In my example I’m creating a quick View to grab any Lead that is in the State of California. Notice in Step 2 of the View you can use a Campaign to filter (handy if your Campaign has your target list as Campaign Members!). Remember you have governor limits based on your edition (see paragraph two of this blog posts).
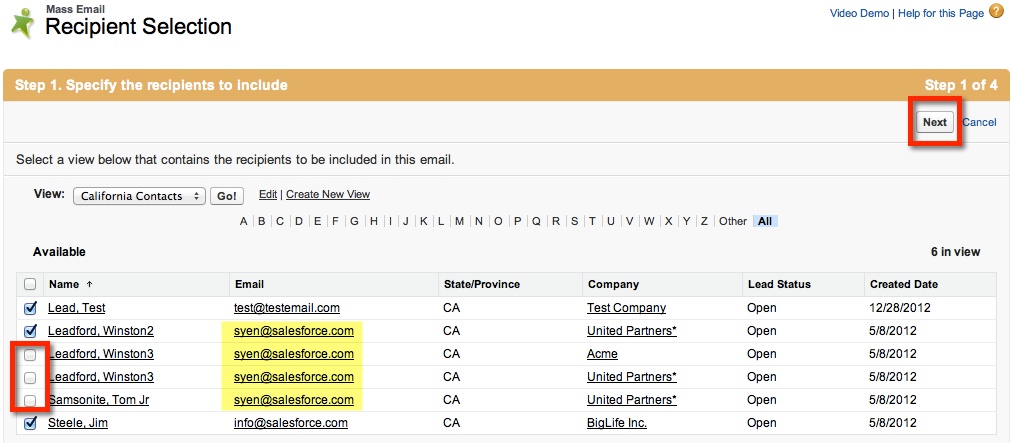
If you’re running Professional Edition for example, and your View pulls more than 250 records, you’ll need to add additional filters to your View to reduce the number of results (for example, Last Name starts with “A,B,C,D,E,F”). Notice that I’ve got a few Leads with the same email address. Like I mentioned before, Salesforce does not “de-dupe” or send based on unique email addresses. That email address is going to get four emails if they remain selected. You can use the checkboxes to the right to exclude any records from your View. Then we can click the “Next” button and proceed to step two of the mass email wizard.
In step two you will navigate to the email folder that has your email, select it, then click “Next.”
In step three you’ll see at the top how many people will receive the mass email. In the Processing Options section you’ll see two checkboxes. The first is to receive a copy of one of the emails (so you know it got sent and how it looked). The second is to tell Salesforce to log a completed activity that a mass email was sent. The Mass Email Name field just below that is NOT the name used when the activity is logged, but rather the identifier when you look at your mass email queued up in Setup > Administration Setup > Monitoring > Mass Emails.
In the last section, Delivery Options, you have the option to schedule the email or send it right now. If you schedule it for the future, you’ll get an email from Salesforce letting you know when you mass email was sent, and you can monitor it from the aforementioned queue.
If you click “Send,” Step 4 of the wizard is simply a confirmation page.
That’s it! You can see that the email was sent by looking at one of the records in the Activity History related list.


