Scheduling appointments with clients can be time-consuming and challenging, especially with meetings involving several people. You can spend a lot of time going back and forth, trying to find a time that works for everyone. Fortunately, Salesforce has a couple of solutions to make scheduling appointments easier:
- Salesforce Scheduler, which makes it easier for clients to schedule their own appointments, and
- Salesforce Inbox, which utilizes email to assist with scheduling.
Salesforce Scheduler
Salesforce Scheduler lets clients schedule appointments themselves by specifying the person, skill sets, location, and time they want. Clients can access available times on the company’s website or on the Experience Cloud site. Before a client can look for appointments, Scheduler needs to be configured. To start the process, the Scheduler app needs to be assigned to the System Administrator profile. The System Administrator can then assign permission sets to the correct people who will manage appointments and make appointments. These people will need various levels of access to the Scheduler Objects. There is also some language to understand:
- Service Resources: advisors or other team members attending appointments
- Skills: Service Resource’s areas of expertise
- Service Territories: locations of the meetings
- Work Type Groups: appointment topics — such as investments or insurance
- Work Types: templates to link appointment topics with particular locations
The appointment parameters that need to be configured are:
- Duration, including if there should be a break before and after appointments, and
- Skills needed for the appointment.
System Administrators can use the step-by-step Salesforce Scheduler Setup Assistant to configure Scheduler. Simply access this through the App Launcher and select View All.

After permissions have been added to the necessary users, the next step is to create operating hours and time slots. Give it a name and set a service appointment window. Select your time zone, select the day of the week, and set the start time and end time of that time slot. Add lines to enter all the time slots that will be available during the operating hours in a week.
The next step is to make a Service Territory by entering the name and a description of the location, such as your office, and select the operating hours (which you set up in the previous step). Enter your office address and check the Active box to be able to add members to the territory and to associate it with appointments. After you add the address, Google Maps will show the exact location on the Details tab.
Now that you’ve entered a location(Service Territory), it’s time to set up the Service Resources — the advisors, or other members of your office, that will attend the meeting.

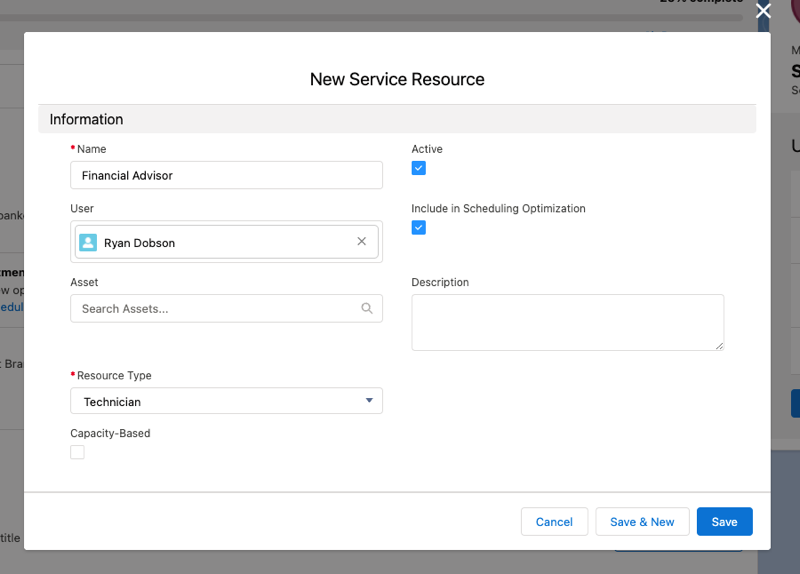
Use the person’s role to name the New Service Resource. In the lookup field, select the User’s name — the advisor you assigned permission sets to earlier. The Resource Type is Technician; make sure it is Active. Assign the advisor as a Service Resources to the appropriate appointment locations (Service Territory), to ensure that their names are associated with the correct offices. You can set a primary and a secondary location. Set a start date for the advisor; no end date is necessary unless they are only at this location temporarily.
The next step is to set up Skills and assign them to each Service Resource. Enter the name of the skill — for example, Wealth Manager or Insurance — followed by a description. Make as many skills as necessary. Assign the skills to the advisors, or Service Resources, and assign a skill level from 0–99. Now, their skills will appear in their respective Skills-related lists. Be sure to assign all the necessary skills, because a resource can’t be assigned to an appointment unless they have all the necessary skills the appointment requires.
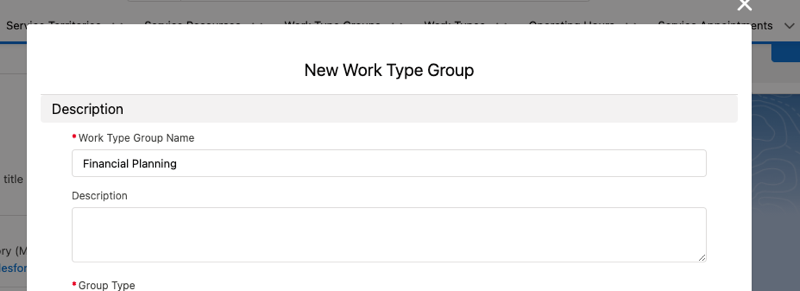
The service appointment topics are set up as Work Type Groups. These could be Financial Planning, Investments, or other topics.

Next, it’s time to use all the components you’ve been assembling to make Work Types. These are templates that include the service appointment topic (financial planning) and the location (your office) to make it easier to standardize service appointment scheduling. Choose the default service appointment type picklist values that may include phone, video, or in-person options for the service appointment template (Work Type). Add a Skill to the template to ensure the appointment is assigned to a Service Resource (financial advisor) with the right skills. Assign a topic (Work Type Group) to a template (Work Type), and assign a template to a location.
Add the Schedule Service Appointment Lightning action to the account page layout to enable appointment scheduling right from the Client Record page. Now you’re ready to make an appointment!
Many of these out-of-the-box labels, such as Service Resource or Work Type Group, aren’t very user friendly for wealth management; however, Salesforce lets you rename labels and tabs to more industry-friendly terms. Service Resource could become Advisor, and Work Type Groups could become Appointment Topics.
Scheduler can be added to your Experience Cloud site or your company website to allow clients to schedule and manage their own appointments. If their information isn’t in Salesforce, they enter their information, and a new lead is created. When the appointment is scheduled, it shows up on the advisor’s calendar with time blocked off before or after the appointment if required. The advisor can click into the contact information and add additional people to the appointment and even add the conference room as an asset.
Salesforce Inbox
Salesforce Inbox works a little differently than Scheduler. This tool works through email to send proposed meeting times to your client. Inbox will also notify you when and if your client has opened your email. If a time slot that you sent to your client later becomes unavailable on your schedule, the email dynamically changes and the client can no longer select that time. You can add other calendars to the email, too. For example, if you and two other people in your office need to meet with a client at the same time, you can add all those calendars to the email of available times. Very handy! That should reduce the time spent scheduling appointments with clients.
Inbox brings your CRM right into your Outlook or Gmail. With Einstein Activity Capture, emails are connected automatically to your Salesforce leads and client records. You are able to respond quickly to leads by using templates and scheduling emails to go out at just the right time. There’s even an app so you can do all this on the go.
Two Powerful Scheduling Tools
To recap, Salesforce Scheduler and Inbox work differently but both help you manage appointment scheduling. Scheduler lets your clients arrange their own appointments through your website, and Inbox lets you send available times to your clients via email. These tools can work together to let your clients make appointments the way they want to, while making it easier for you and your team to manage scheduling.
Talk to ShellBlack about taking the hassle out of scheduling appointments and more with Salesforce wealthtech software.
Author Credit:
Lisa Kilmer CFP©
Salesforce Consultant at ShellBlack.com